Sunday, November 30, 2014

Try web development in Go with Slothful Soda, a small web app in the GGAP Stack (Part 2)


If you followed along with my last tutorial on the GGAP Stack, when we finished the tutorial, we had written a web server in Go for our web app Slothful Soda. This app had a Postgres database of locations where you can get Slothful Soda delivered, which we accessed on the server-side in Go using a database package called GORP. Our routing was handled with a combination of plain Go HTTP routes for files in our public directory (like images and CSS) and routes from a Gorilla mux Router for serving the data from our database as well as the main Angular.js app the user will be accessing. For this tutorial we will be writing that Angular.js app.

As I mentioned at the end of the last tutorial, we wrote all the Go code for Slothful Soda in that tutorial, so this is going to be nothing but Angular.js, but we are going to see how the Angular.js app in this tutorial integrates with the Go code we wrote in the last tutorial.

You can see the final product at andyhaskell.github.io/Slothful-Soda and you can see the repository for the app at github.com/AndyHaskell/Slothful-Soda.

Preparing our index.html file for the Angular.js app

First we are going to need to get Angular.js, and since this will be a Google Maps app, we are also getting the Google Maps API. Additionally, we will also be getting Twitter Bootstrap, a very popular CSS framework that we will be using to quickly add a design to our web app. So first, replace the contents of the <head> tag of views/index.html with:

<title>Slothful Soda, Rehydrate Slothfully</title>

<meta charset="utf-8">

<link rel="stylesheet" href="https://maxcdn.bootstrapcdn.com/bootstrap/3.3.0/css/bootstrap.min.css">
<script type="text/javascript" src="https://maps.googleapis.com/maps/api/js?key=YOUR_GOOGLE_MAPS_API_KEY&sensor=true"></script>
<script src="https://ajax.googleapis.com/ajax/libs/angularjs/1.3.0/angular.min.js"></script>
<script src="https://ajax.googleapis.com/ajax/libs/angularjs/1.3.0/angular-route.js"></script>
                                                                                
And where it says YOUR_GOOGLE_MAPS_API_KEY, replace YOUR_GOOGLE_MAPS_API_KEY with your Google Maps API key.


The files we are getting are Twitter Bootstrap, the core Angular.js file (for Angular's main functionality), angular-route.js (for making it so Angular.js app has its own routing logic), and the Google Maps API, which we will be using to create a Google Map.

You can download Twitter Bootstrap and the Angular files yourself and serve them from the public/scripts directory as well if you would rather get the files that way but for this tutorial I chose to just download them on their CDNs so I could keep the number of files in the app's GitHub repository small.


Now that we have our files, let's add the parts of the HTML for our Angular.js app.

First, replace <html> with <html ng-app="app">, which uses the ngApp directive tell Angular.js that our Angular.js app is the whole HTML file.


In the <head>, add the line

<script src="/scripts/app.js"></script>

to get the main file for our Angular.js app, which we are about to make.


Then, replace the contents of the HTML <body> with:

<div id="main" class="container" ng-view></div>

Which uses the ngView directive to tell Angular.js we will be rendering the content of the Angular.js app in that <div>.


Now let's make a basic app.js file and the views it will render.

Adding app.js and our views

First, in public/scripts, make a file called app.js and in it add this code:
app = angular.module('app', ['ngRoute']);             //1

app.config(function($routeProvider){                  //2
  $routeProvider
    .when('/', {templateUrl: '/partials/main.html'})  //3
    .when('/map', {templateUrl: '/partials/map.html'})
    .otherwise({redirectTo: '/'});                    //4
});

                                                                                
This is where we are defining our Angular.js app and its routing logic. Here's what's going on:

1. We define an Angular.js module app that uses the ngRoute module (from angular-route.js) as a dependency for our routing logic.

2. For giving the app its routing logic, we will use the $routeProvider service.

3. If the user goes to the path '/', in the ng-view div, render the main.html partial. If the user goes to '/map', render the map.html partial.

4. If the user goes to any other path, redirect the user to '/' and since we're there, render main.html.


To get this to work, we are going to need some partial HTML files for Angular.js to work with, so in public/partials, make a main.html file and add this HTML:
<div>
  <h1 class="center">Slothful Soda, Rehydrate Slothfully</h1>
 
  <img id="hibiscus-img" src="/images/hibiscus.png" />
  <p class="center">
    With all the people playing Ultimate at parks in Boston, water just won't
    cut it as a way to rehydrate. That's why the sloths living in Cambridge's
    Fresh Pond invented Slothful Soda, a delicious soda made from hibiscus
    flowers for the most slothful way to re-hydrate after your game. Rehydrate slothfully!
  </p>
</div>
                                                                                

And make a map.html file with this placeholder HTML:
<div id="locations">
  <h3>Find fields where you can buy Slothful Soda</h3>
  <h1>Locations coming soon</h1>
</div>
                                                                                

Then in the slothful-soda directory, run slothful-soda and go to localhost:1123 and you should get:


And if you go to localhost:1123/#/map, you should get:

This is the routing logic for our Angular app:
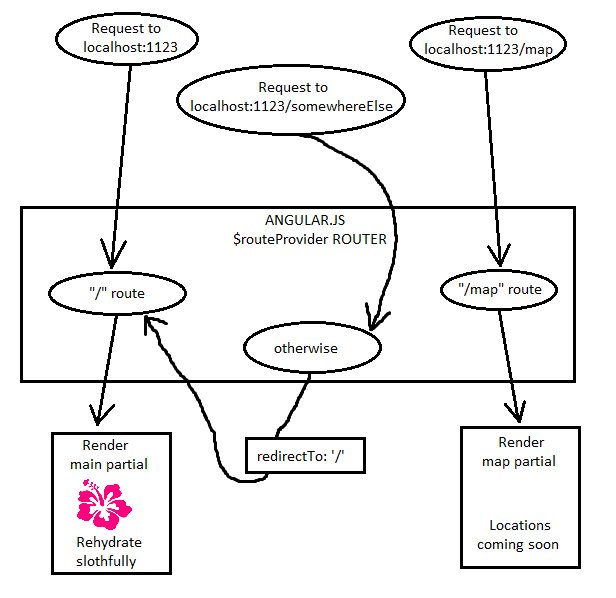

Getting rid of that #

Very cool, now we have our Angular.js routing done. But there's one pet peeve I have with the URLs. Notice how when you request the main page the URL automatically changes from localhost:1123 to localhost:1123/#? And to request the map page you have to go to localhost:1123/#/map?

That # gives our Angular.js app the feel of being all one page even though in effect we are having it function as two pages. Our Angular.js app is everything that the user interacts with directly and that means for the user, this app is the whole website, so that # has got to go. Luckily, Angular.js gives us some HTML5 magic for getting rid of the #.

First, in the <head> of index.html, add this line:

<base href=”/”>

This line tells the browser where to direct relative links in the HTML. For example, if the href of the <base> tag is “/”, clicking a link to <a href=”someRoute”> would link you to “/someRoute”. But if it the base's href was “/somewhere-else/”, then <a href=”someRoute”> would link you to “/somewhere-else/someRoute”. Having your <base> tag set up is necessary for this Angular.js trick.


Now in app.js, change your code to this:
app = angular.module('app', ['ngRoute']);

app.config(function($routeProvider, $locationProvider){//1
  $routeProvider
    .when('/', {templateUrl: '/partials/main.html'})
    .when('/map', {templateUrl: '/partials/map.html'})
    .otherwise({redirectTo: '/'}); 

    $locationProvider.html5Mode(true);                 //2
});
                                                                                
Here's what's going on:

1. We are using the $locationProvider service from Angular.js, which lets us work with the URL at the top of the browser in our web app.

2. $locationProvider.html5Mode basically makes it so your Angular.js app has URLs that look like different pages of a website instead of different sections of the same page. For older browsers, though, it keeps the #-based Angular.js app URLs for older browsers.

Now you can get to the main page by going to localhost:1123 and you can get to the map page by going to localhost:1123/map instead of localhost:1123/#/map.

By the way, shoutout to scotch.io for this post that let me figure out this part of Angular.js routing and to VerdantRefuge for this post that helped me figure out how to do the html5Mode routing on Slothful Soda's GitHub page.

Getting the locations from the database to our Angular.js app

Near the end of the last tutorial, we made one of the routes (/locations) in our Go web app fetch the locations in our database and then serve data in JSON. Now on the Angular.js side of the app, we have a /map route so to populate it with data we are going to need to fetch the data from /locations and then on the client-side, use the data to build our map.

First we are going to need an Angular.js controller for the map page, so in public/scripts, add a controllers directory.

Then, in the controllers directory, add a file called MapCtrl.js with this code:
app.controller('MapCtrl', function($scope, $http){ //1 
  $scope.locations = [];

  $scope.initialize = function(){
    $http.get('/locations').success(function(data){//2
      $scope.locations = data;                     //3
    }).error(function(data){                       //4 
      $scope.locations = [];
    }); 
  };
});
                                                                                
Here's what the code does:

1. In our Angular.js app, we are creating a controller that will use the Angular $http service.

2. When our controller's initialize method is called, the $http service will make a GET request to the /locations route on our Gorilla router to try to get the data.

3. If we get data back, the controller's locations array will now hold the data (which is automatically converted from a JSON array to a JavaScript array)

4. If we get an error, the locations array will just be an empty array.


Now that we have a controller that gets our locations, let's display them.

In views/index.html, to load the MapCtrl.js script, add this <script> tag to the HTML file's <head>:

<script src="/scripts/controllers/MapCtrl.js"></script>


Next, to use the MapCtrl controller, we will need to add it to public/scripts/app.js too, so change the .when('/map', …) route to:

.when('/map', {templateUrl: '/partials/map.html', controller: 'MapCtrl'})

Which tells the Angular.js app to have our view use MapCtrl as its controller when we're on the /map route.


Finally, in public/partials/map.html, change the HTML to:
<div id="locations" ng-init="initialize()"> 
  <h3>Find fields where you can buy Slothful Soda</h3>
  <div id="locations-box"> 
    <ul> 
      <li ng-repeat="location in locations">{{location.Name}}: ({{location.Lat}}, {{location.Lng}})</li> 
    </ul>
  </div>
</div>
                                                                                

Notice in the first line, we are calling the MapCtrl controller's initialize method on initialization, which will get the data. Also, in our <ul>, we take the data from MapCtrl's locations array and display each location with ng-repeat.

Now if we run slothful-soda and go to localhost:1123/map, we should get:


This is what getting the MapCtrl controller and the locations data looks like:


Adding a header and some custom CSS

Now we have a list of locations, but instead of having just a list of locations, we are going to have a Google Map displaying where to get Slothful Soda. Since we are about to make that, now is a good time to add a navbar header to our webpages to make navigation easier.

Since we're adding all this stuff, let's add a CSS stylesheet for the web app. In public/styles, add a stylesheet called main.css and add in this code (no need to read the CSS, just know it's there to build on the default designs in Twitter Bootstrap):
 html{ 
  width:  100%;
  height: 100%;
}

body{ 
  width:       100%;
  height:      100%; 
  padding-top: 70px;
}

p{ 
  font-size: 1.6em;
}

#navbar{ 
  height: 50px;
}
#navbar a:hover{ 
  color: #FF0088;
}
#logo{ 
  color: #FF0088;
  padding-top: 12px;
}
.logo-img{ 
  width:  30px;
  height: 30px;
}
.navbar-brand { 
  color: #FF0088;
}
.navbar-brand > img{ 
  display: inline;
}

#main{ 
  height: 100%;
}
#locations-box{ 
  margin-bottom: 15px;
}
#locations{ 
  width:  100%;
  height: 100%;
}
#map{ 
  width:  100%;
  height: 72%;
}

.center{ 
  text-align: center;
}
#hibiscus-img{ 
  width:  300px;
  height: 300px;
}
#sloth-img{ 
  width:  240px;
  height: 300px;
}
                                                                                

And in views/index.html, to include the CSS add this line in the <head> of the HTML:

<link rel="stylesheet" href="/styles/main.css">


Let's also add a header to make getting around the app easier. In public/partials, make a file called header.html and add this HTML:
<div id="navbar" class="navbar navbar-inverse navbar-fixed-top"> 
  <ul class="nav navbar-nav">
    <li> 
      <a id="logo" class="navbar-brand" href="/">
        <img class="logo-img" alt="Hibiscus logo" src="/images/hibiscus.png" /> 
        Slothful soda 
      </a>
    </li> 
    <li><a href="/">Main page</a></li>
    <li><a href="/map">Map of our locations</a></li> 
  </ul>
</div>
                                                                                

To make it so that this header is on our pages, in views/index.html in the first line of the <body>, add this line:

<div ng-include="'/partials/header.html'"></div>

which uses ng-include to get the header.html partial view. Since this is outside of the ng-view div, this header will be on the top of all pages of our Angular.js app.


Since we got our CSS ready to go, while we're at it let's update public/partials/main.html to
<div> 
  <h1 class="center">Slothful Soda, Rehydrate Slothfully</h1>

  <h1 class="center">
    <img id="sloth-img" src="/images/sloth.jpg" /> + 
    <img id="hibiscus-img" src="/images/hibiscus.png" /> = AWESOME SODA
  </h1> 
  <p class="center">
    With all the people playing Ultimate at parks in Boston, water just won't 
    cut it as a way to rehydrate. That's why the sloths living in Cambridge's
    Fresh Pond invented Slothful Soda, a delicious soda made from hibiscus 
    flowers for the most slothful way to re-hydrate after your game.
Rehydrate slothfully! 
  </p>
</div>
                                                                                

and now if you run slothful-soda and go to localhost:1123 you should get:


Okay, now that we have our CSS and navbar and main page view all set, let's get cracking on that Google Map!

Adding the Google Map

For adding in the Google Map, we are going to have the map be part of our MapCtrl controller.

In public/scripts/controllers/MapCtrl.js, change the code to this:
app.controller('MapCtrl', function($scope, $http){ 
  $scope.locations = []; 
  $scope.markers   = []; 
  $scope.map       = null;

  var ourLat = 42.388282,
  ourLng     = -71.153968;

  var initMap = function(){
    var options = {                                                      //1 
      center   : {lat: ourLat, lng: ourLng},
      mapTypeId: google.maps.MapTypeId.HYBRID, 
      zoom     : 12
    };

    var map = new google.maps.Map(document.getElementById('map'), options);
    $scope.map = map; 
  }; 

  //Initialize the map and the markers
  $scope.initialize = function(){ 
    $http.get('/locations').success(function(data){
      $scope.locations = data; 
      initMap();                                                         //2 
    }).error(function(data){ 
      $scope.locations = []; 
      initMap(); 
    });
  };
});
                                                                                
The main thing to focus on is initMap. Here's what's going on:

1. We are creating a Google Map in the map div, which will be a street-satellite HYBRID map centered at the Cambridge Fresh Pond, and we will be storing the map object in $scope.map.

2. In $scope.initialize, after we get the locations, we call initMap to make the map.


Now in public/partials/map.html after the locations-box div, add this div:

<div id="map"></div>


And a Google Map should render zoomed in on the Boston area. Now to add the markers, in initMap after the line $scope.map = map; add this code:
 for (var i = 0; i < $scope.locations.length; i++) { 
  var currentLoc = $scope.locations[i];                               //1

  var markerOptions = {
    position: new google.maps.LatLng(currentLoc.Lat, currentLoc.Lng), 
    title   : currentLoc.Name,
    visible : true, 
    map     : map
  };

  var marker = new google.maps.Marker(markerOptions);                  //2
  $scope.markers.push(marker);
}
                                                                                
1. For each index in the $scope.locations array, we get the location object at that array index and create a JavaScript object called markerOptions storing the location data.

2. We then make a Google Maps marker from the markerOptions object and add it to the $scope.markers array so the MapCtrl controller can access the Google Maps markers. Creating the marker also puts the marker onto our Google Map. 


Now if we run slothful-soda and go to localhost:1123/map, we should get:


Cool! Now we have a list of locations where you can get Slothful Soda on a Google Map!

Filtering the locations by distance

For the last step of this tutorial, we are going to make an input box that makes it so people can search for all locations for Slothful Soda within x miles of the Cambridge Fresh Pond. So if someone types in 5, it will search for all locations within 5 miles of the Fresh Pond and you will see all locations. But if they type in 2, it will only show markers for Danehy Park and Hodgkins Park since they are within 2 miles of the Fresh Pond. So for this feature, let's start by adding the HTML for this feature. Change the HTML in public/partials/map.html to
<div id="locations" ng-init="initialize()">
  <h3>Find fields where you can buy Slothful Soda</h3>
  <div id="locations-box"> 
    Show all locations within:
    <input id="" ng-model="distance" ng-keyup="refreshDistance()" />
    miles of the Cambridge Fresh Pond 
  </div>
  <div id="map"></div>
</div>

                                                                                
ng-model=”distance” means what's in the input box is bound to $scope.distance in MapCtrl, so if you type a number, say, 1.123, into the input box, Angular.js will automatically set $scope.distance in MapCtrl to 1.123. This is an example of Angular's two-way data binding.

Also notice ng-keyup=”refreshDistance()”. refreshDistance is the function we will be calling to update the map each time someone types into the input box.

Now let's add the code to get this feature up and running!

 
Adding code for our distance feature

Since we are working with distance, let's make an Angular.js service called Distance for handling the distance from the Fresh Pond to different parks in Boston. The reason why I want to make an Angular.js service instead of just putting a distance function in MapCtrl is for better modularity. We are making it so MapCtrl works with rendering the map and displaying the markers, so a distance function feels pretty stand-alone.

To make our Distance service, first in public/scripts, make a new directory called services and in that directory add a file Distance.js with this code:
app.factory('Distance', function(){ 
  //Earth's radius in miles
  var RADIUS_OF_EARTH = 3959;

  //Degrees to radians function
  var radians = function(degrees){ 
    return degrees * (Math.PI/180);
  };

  //Great circle distance function
  var distance = function(lat1, lng1, lat2, lng2){ 
    var lat1 = radians(lat1),
        lng1 = radians(lng1), 
        lat2 = radians(lat2),
        lng2 = radians(lng2), 
        angle = Math.atan(
          Math.sqrt( 
            Math.pow((Math.cos(lat2)*Math.sin(lng2-lng1)),2) +
            Math.pow((Math.cos(lat1)*Math.sin(lat2)-Math.sin(lat1)* 
            Math.cos(lat2)*Math.cos(lat2-lat1)),2))/
          (Math.sin(lat1)*Math.sin(lat2)+ 
           Math.cos(lat1)*Math.cos(lat2)*Math.cos(lng2-lng1)));

    return angle * RADIUS_OF_EARTH;
  };

  return {distance: distance};
});
                                                                                
No need to read the code. Just know that we are creating a service in our Angular.js app called Distance and it exports a function for the distance between two latitude-longitude coordinates in miles with the great-circle distance formula.


Now in views/index.html, add this <script> tag to the <head> so we can use our Angular.js service.

<script src="/scripts/services/Distance.js"></script>


And in our MapCtrl.js file, first change the first line of the controller's definition to:

app.controller('MapCtrl', function(Distance, $scope, $http){

to include our Distance service in the controller.


Now MapCtrl can use the Distance service, so now let's use it.

In the first few lines defining MapCtrl, add these variable declarations:

$scope.lastDistance = 5;
$scope.distance     = 5;

$scope.distance is the distance currently in the input box (as a string).

$scope.lastDistance will be the most recent distance stored in the input box (as a number), so if someone types an invalid distance into the input box (like “this is not a distance”), we still have a valid distance we can display.


At the bottom of the controller's code, add this function:
//Show only markers on the map within the specified number of miles
$scope.refreshDistance = function(){ 
  var miles = parseFloat($scope.distance);                                   //1
  miles = isNaN(miles) ? $scope.lastDistance : miles;                        //2 
  $scope.lastDistance = miles;                                               //3

  var markers = $scope.markers;

  for (var i = 0; i < markers.length; i++) {
    var pos = markers[i].getPosition(); 
    var lat = pos.lat(),
        lng = pos.lng();

    markers[i].setVisible(Distance.distance(ourLat,ourLng,lat,lng) <= miles);//4
  }
}
                                                                                
refreshDistance takes the distance in the input box and displays only the markers on the map that are closer to the Fresh Pond than that distance. Here's how it works:

1. We take the string $scope.distance in the input box, convert it to a number, and store it in miles.

2. If the input box doesn't contain a valid number, miles has a value of NaN, so miles will store $scope.lastDistance so we still have a valid distance to use.

3. We update $scope.lastDistance to store the value in miles.

4. For each Google Maps marker on the map, we display it if the distance between the marker and the Fresh Pond is less than miles. We determine the distance using the distance function in our Distance service.


Now, at the end of the initMap function, add the line

$scope.refreshDistance();

so refreshDistance is called when the map is created.


No need for a screenshot here since this is the final product. Run slothful-soda and go to localhost:1123/map and your map page should now look like the page on http://andyhaskell.github.io/Slothful-Soda/map

Congratulations! Now you have made a small web app written in the GGAP Stack and I hope this got you interested in doing more web development in Go. I am planning on adding on to Slothful Soda to have features like HTTP POST requests and other cool stuff I learn how to do in Go, so stay tuned. There is a lot to explore in Go web development, and I gave Slothful Soda the MIT License, so feel free to use Slothful Soda to practice with other Go web development features! Until next time, stay slothful!

*The gopher mascot is the Go Gopher, which was drawn by Renee French.
*The Angular.js shield was made by the Angular.js team and is licensed under the "Creative Commons Attribution-ShareAlike 3.0 Unported License", so my diagram with that logo and the logo of this tutorial are also licensed under that license.

Friday, November 14, 2014

Try web development in Go with Slothful Soda, a small web app in the GGAP Stack (Part 1)

Lately I've been learning web development in Google's fairly-new programming language, Go (also known as Golang), and overall I think it's definitely worth giving a try for web programming, so I recently made a small web app called Slothful Soda to show a sample of what full-stack web development in Go can look like. I call the stack I am using GGAP, which stands for Golang, Gorilla, Angular, Postgres.

Right now, while the Go user-base is very fast-growing, it isn't as popular as Node.js, and I don't get the vibe there is one hyperpopular web stack in the Go community like there is with the MEAN Stack (MongoDB, Express, Angular, Node) in the Node community, but there are several stacks to choose from. I picked the GGAP Stack because I think it's straightforward to pick up straight from learning Go itself.

This tutorial does assume you know the basics of Go and some Angular.js and have Postgres installed. If you are new to Go, you can learn the language quickly at tour.golang.org (I found it especially easy to learn from C++), if you are new to Angular, I recommend checking out the tutorials at scotch.io (also great if you are trying to figure out the MEAN Stack). As for Postgres, I really don't know that much about the database myself so you really just need it installed for this tutorial.

Also, since this tutorial teaches how to make a full web app from just knowing Go, JavaScript, and Angular, it'll throw a lot at you.  If you're looking for a more basic tutorial on working with Go web servers and Gorilla routing to get a better understanding of working with web servers in Go, I recommend checking out this tutorial on my blog.

Meet the GGAP Stack

Go: Go is a programming language made by Google that compiles to some very fast programs and uses a lot of great features used in other languages, like structs, anonymous functions, and type inference. It's especially notable for having really intuitive support for concurrent programming, but we won't be talking about that in this tutorial.

Gorilla: Gorilla is a series of Go packages that that provide a lot of functionality for your web apps. Some of these features include the mux package for providing routing for your web app that feels similar to Express.js's routing in Node, the websocket package, which provides an interface for WebSocket communication (stuff like chat rooms and real-time online games), and the session package for giving your web apps support for sessions. Today we will be focusing on the mux package.

Angular.js: Angular is a very popular front-end web framework developed by Google, and in Angular instead of the style of using jQuery for DOM manipulation, you can put the presentation logic straight into your HTML while using JavaScript only for stuff that's behind the scenes like AJAX requests. Angular.js has a pretty big ecosystem to learn, but its popularity means you can find tons of resources for learning how to use it.

PostgreSQL/Postgres: Last but not least is our database for this web app, PostgreSQL. I'm actually new to Postgres myself, so I can't say much about why it's awesome but what I do know is it's a relational SQL database and I've heard good stuff about its speed. I wanted to use a relational database for this instead of a NoSQL database like MongoDB because I felt that the row/table structure of a relational database pairs well with Go's structs. However, there is a MongoDB driver for Go called mgo, so you can definitely do MongoDB in Go too.

The story of Slothful Soda

This web app is about a hibiscus-flavored soda called Slothful Soda, which a group of sloths living by the Cambridge Fresh Pond invented because of how popular playing Ultimate was in the parks around Boston. They knew these athletes were thirsty from their games, so they created their brand of hibiscus-flavored soda to deliver to parks in the Boston area by flying to those parks on quadcopters (DISCLAIMER: This is a fictional soda brand and there are no sloths living at the Cambridge Fresh Pond and definitely no sloths who know how to operate a quadcopter. Don't tell your friends who are likely to believe stories from The Onion about this blog post because if sloths figure out how to use quadcopters it means the Apocalypse is here and we really don't need any more bogus Apocalypse theories).

The places they want to deliver to are:

-The Residential Quad at Tufts University, at 42.408565 degrees latitude, -71.121765 degrees longitude
-Hodgkins Park in Somerville, at 42.399566 degrees latitude, -71.124595 degrees longitude
-Danehy Park in Cambridge, at 42.388306 degrees latitude, -71.137507 degrees longitude
-and Lederman Park in Boston, at 42.363649 degrees latitude, -71.071774 degrees longitude

But the sloths need to get the word out where they deliver their soda, so they needed a website. They got their claws on Go and Postgres, and after installing them, they made a web app to tell people how many of their locations are within some number of miles of the Cambridge Fresh Pond.

To see the app in action, you can swing by andyhaskell.github.io/Slothful-Soda, and to see all my source code for this web app, go to github.com/AndyHaskell/Slothful-Soda.

Getting started with a Hello world HTTP server

Let's start with a hello world HTTP server. Go to the src subdirectory your GOPATH and make a directory called slothful-soda. Go into that directory and write a server.go file that contains the following code:
package main

import (
    "fmt"
    "net/http"                                                        //1
)

func main(){
    http.HandleFunc("/", func(w http.ResponseWriter, r *http.Request){//2, 3
        fmt.Fprintf(w, "Hello world!") 
    })

    fmt.Println("Starting server")
    http.ListenAndServe(":1123", nil)                                 //4
}
                                                                                
Here's what it does:

1. For making our HTTP server, Go has a built in net/http package.

2. net/http handles HTTP requests to specific routes with http.HandleFunc, which takes in the route we want to handle requests to and a function for handling the request. We are handling requests to the “/” route, which in Go's http package handles all requests.

3. The function takes in an HTTP request and an I/O structure called a ResponseWriter that makes an HTTP response, which in this function is the message “Hello world!”

4. Once we have our server defined, we listen for HTTP requests on a port using http.ListenAndServe. For our web app, we will be listening on Port 1123.


Run go install and then run the slothful-soda command and in your browser go to localhost:1123 and you should get:


This is a diagram of the server:


Awesome! Now we have a Go web server. Next, let's add an images directory.

Serving images on our server

In your slothful-soda directory, make a directory called public and then in that directory, add directories called images, partials, scripts, and styles. This public directory is where we will be serving files used on the front-end, like images, partials for Angular.js rendering, client-side JavaScript, and CSS stylesheets.

Download these pictures and put them in the images directory as sloth.jpg and hibiscus.png.


Then in server.go in the slothful-soda directory, add this line just after the HandleFunc rule we made earlier.

http.Handle("/images/", http.StripPrefix("/images/",
                          http.FileServer(http.Dir("public/images"))))
                                                                                

This code uses http.Handle, which takes in a route and a Handler to process the requests. The route is “/images/”, which means we want the Handler to process any requests that start with “/images/”, such as localhost:1123/images/sloth.jpg.

http.FileServer creates a Handler that serves files from a specified directory, which in our case is public/images. So when the we get a request to a URL that starts with “/images/” like “localhost:1123/images/sloth.jpg”, we look in the public/images directory to find the image and if the image exists, we serve the image.

http.StripPrefix gets rid of the “/images/” part of the request so when we are looking in the images directory the FileServer handler only uses the parts of the request URL after “/images/”. Without it, if we requested localhost:1123/images/sloth.jpg, the FileServer would look for a file “public/images/images/sloth.jpg”, but with StripPrefix, the FileServer works correctly, looking for sloth.jpg in “public/images/sloth.jpg”.

Taken together, this call to http.Handle makes it so requests that start with “/images/” are handled by serving an image in the public/images directory.

This is a diagram of what that looks like:


So if we request localhost:1123/images/sloth.jpg, we get:


And if we change the “Hello world!” message to

"<div><img src=\"images/sloth.jpg\" width=\"300px\" height=\"400px\"/>Hello world!</div>"

we get this when we request localhost:1123:


Making our server serve Angular.js partials, JavaScript, and CSS works the same way, so we are going to bundle all of them into one function called addStaticRoutes:

func addStaticRoutes(){
    http.Handle("/partials/", http.StripPrefix("/partials/",
                http.FileServer(http.Dir("public/partials"))))
    http.Handle("/scripts/", http.StripPrefix("/scripts/",
                http.FileServer(http.Dir("public/scripts"))))
    http.Handle("/styles/", http.StripPrefix("/styles/",
                http.FileServer(http.Dir("public/styles"))))
    http.Handle("/images/", http.StripPrefix("/images/",
                http.FileServer(http.Dir("public/images"))))
}
                                                                                

And in the main function, we can now replace the images handler we had before with a call to addStaticRoutes().

Creating a Location struct

For our next step we are going to get cracking on giving this web app some data, so we are going to need a data structure for the locations where the sloths will be delivering their sodas, so let's make a Location struct. In the slothful-soda directory, make a new file called Location.go and in it add this code:
package main

type Location struct{
    Id int
    Name string
    Lat float64
    Lng float64
}

func initLocation(name string, lat, lng float64) *Location{
    return &Location{Name: name, Lat: lat, Lng: lng}
}
                                                                                
For this code, we are just defining a Location struct that will to represent the locations in the database. We also created an initLocation function that gives us a pointer to a new location structure (with the ID number uninitialized since the Postgres database will handle that for us).

Creating our database table and using GORP

Now we are going to need to go get a couple packages for working with our Postgres database.

First, run go get github.com/lib/pq to get a Postgres database driver for Go to work with.

Then, run go get github.com/coopernurse/gorp to get GORP.

What is GORP, you ask? GORP stands for Go Relational Persistence and it is a Go package used for smoothly marshaling your data between Go structs and database rows. It wraps a lot of database functionality, so you don't have to write as much SQL (in this web app we only use one line of SQL).

I think it is kind of like Mongoose is for Node/MongoDB, where it provides a convenient interface for a lot of database functionality. As for the pq module, we won't use it directly, but rather GORP will use pq to communicate with the database.


To get started with our database, make a file in the slothful-soda directory and make a file called initDB.go. In the file add the code:
package main

import ( 
    "database/sql"                                                     //1
    "log"

    "github.com/coopernurse/gorp"                                      //2
    _ "github.com/lib/pq"

)

func initDB() *gorp.DbMap{                                             //3 
    db, err := sql.Open("postgres", "postgres://yourPostgresLoginInfo")//4
    if err != nil {
        log.Fatal(err) 
    }
    
    err = db.Ping()                                                    //5 
    if err != nil {
        log.Fatal(err) 
    }

    dbMap := &gorp.DbMap{Db: db, Dialect: gorp.PostgresDialect{}}      //6

    return dbMap
}
                                                                                
and at the start of the main function in server.go, add this code at the beginning to make sure initDB ran properly:

db := initDB()
db = db
                                                                                

If you gave the right login information for your Postgres database, your server should start, indicating you had no problem connecting. Otherwise you should get an error saying what went wrong.


Here's what's going on:

1. For working with SQL databases like Postgres, Go gives you the standard database/sql library

2. We are also importing pq and GORP. For pq, we are importing it as _ because we aren't using pq directly; it is just there so when we are opening the database Go can use the Postgres driver.

3. initDB returns a pointer to one of GORP's structures called a DbMap, which is a structure in GORP that maps between the database and your Go structs and will be used for communicating with our database.

4. We connect to our Postgres database with sql.Open, giving it the string “postgres” to tell sql.Open we are opening a Postgres database and then giving a string for connecting to your Postgres database.  To connect properly, you will need to replace "postgres://yourPostgresLoginInfo" with a login string with your actual Postgres login information.

5. After we open the database, we ping the database to catch any errors from during the login, like getting the password wrong.

6. Finally, we make a DbMap for the database we opened. The dialect we are giving the DbMap is GORP's “PostgresDialect”, which basically is telling GORP we are using a Postgres database.

Making the database table

All right, so we have a DbMap, so now we are going to make a database table of Locations. First, we need to create a TableMap in GORP, which is a data type in GORP for representing database tables.


So first, we will make the TableMap by adding this code in initDB just after where we initialize our DbMap:

locationsTable := 
  dbMap.AddTableWithName(Location{}, "locations").SetKeys(true, "Id") 
                                                                                

AddTableWithName is used to create a TableMap for a certain data type in your Go code. For this struct we specified that we wanted our TableMap to work with the Location data type and we named the database table “locations”.

After AddTableWithName, we have the function call .setKeys(true, “Id”), which will make it so the Id field of our locations database table will automatically increment with each location added to the table.


Then we will want to make sure we aren't getting null values for the name and latitude and longitude coordinates of our locations, and we want to make sure there are no duplicate names for different locations in the database, so we will add this code after AddTableWithName:
//               1,               2,             3
locationsTable.ColMap("Name").SetNotNull(true).SetUnique(true)
locationsTable.ColMap("Lat").SetNotNull(true)
locationsTable.ColMap("Lng").SetNotNull(true)
                                                                                
1. TableMap.ColMap() gives us a ColumnMap, which is a GORP structure that corresponds to a column of the database table.

2. ColumnMap.SetNotNull() is used to specify that for the column in the database table we don't want that column to accept null values.

3. Finally, ColumnMap.SetUnique() is used to specify that for the column in the database table we only accept unique values.


Note that all of these things are things we could be doing in SQL, but GORP is making it so we can keep our work on building the locations database table all in Go (NOTE: If you already have a database table named locations for a different project, you might want to rename or back up that table for now since this next section has code that will delete the locations table in your database).

Now, for the last part of creating the database table, add this code after the calls to SetNotNull and SetUnique:
err = dbMap.DropTablesIfExists()     //1 
if err != nil {
    log.Fatal(err)
}

err = dbMap.CreateTablesIfNotExists()//2
if err != nil { 
    log.Fatal(err)
}
                                                                                
1. First, we get rid of the locations table if one already exists (such as from previously running the server) using dbMap.DropTablesIfExists, which does exactly what it says on the tin.
2. Another self-explanatory function, dbMap.CreateTablesIfNotExists creates our database table.


Run go install and then run slothful-soda and if you look at your database you should have a database table without having written any SQL!


Here's a diagram of what happens when the database table is being created:


Now to add some data to the table!

All right, so we have an empty database table, so now let's get this table populated. First, let's make a populateLocations function in initDB.go that takes in our DbMap and inserts some Location structs into the database.
func populateLocations(locationsMap *gorp.DbMap) {                       //1
    tuftsResQuad := initLocation("Tufts Res Quad", 42.408565, -71.121765)//2
    hodgkinsPark := initLocation("Hodgkins Park", 42.399566,-71.124595)
    danehyPark   := initLocation("Danehy Park", 42.388306,-71.137507)
    ledermanPark := initLocation("Lederman Park", 42.363649,-71.071774)

    err := locationsMap.Insert(tuftsResQuad, hodgkinsPark,
                               danehyPark, ledermanPark)                 //3

    if err != nil {
        log.Fatal(err)
    }
}
                                                                                
Here's what's going on:

1. Our populateLocations function takes in a DbMap for adding our Locations into the database.

2. We create one Location struct for each location we want in the database.

3. We add the Locations into the locations table of our database using the DbMap.Insert function.

Note that the DbMap knows to add the Locations to the locations table because our call to dbMap.AddTableWithName earlier associated the Location struct with the locations table.


Now, at the end of initDB, right before return dbMap, add the line:

populateLocations(dbMap)


And then run go install and slothful-soda and you should see that your locations table has been populated.


Creating our Gorilla router

Now that we have our database table, we're going to want a /locations route, which our Angular app will use for getting the data from the table, and a catch-all / route to serve our Angular app, which will have everything users can see.

Since we are making these routes, now is a good time to move our routing logic for the /locations and catch-all / routes from the basic Go http routing to a Gorilla router.


First, we will need to go get github.com/gorilla/mux to get Gorilla's mux package.

Then in the slothful-soda directory, create a file called router.go and in it add in this code:
package main

import ( 
    "fmt"
    "net/http"

    "github.com/gorilla/mux"
)

func indexRoute(w http.ResponseWriter, r *http.Request){    //1 
    fmt.Fprintf(w, "<div><img src=\"images/sloth.jpg\" width=\"300px\" height=\"400px\"/>Hello world (now routed with Gorilla)!</div>")
}

func locationsRoute(w http.ResponseWriter, r *http.Request) {//2 
    fmt.Fprintf(w, "Locations will be displayed here")
}

func initRouter() *mux.Router{ 
    r := mux.NewRouter()                                     //3
    r.HandleFunc("/locations", locationsRoute)               //4 
    r.HandleFunc("/{url:.*}", indexRoute)                    //5

    return r
}
                                                                                
The initRouter function creates our Gorilla router. Here's how it works:

1. indexRoute is a handler function for serving our index page, which for now has the picture of the sloth as a placeholder.

2. locationsRoute is a handler function for serving our locations data, which for now has “Locations will be displayed here” as a placeholder.

3. We initialize a Gorilla mux router with mux.NewRouter.

4. Much like HandleFunc in Go's standard http package, HandleFunc in gorilla/mux takes in a route and a handler function. In this line of code, we are telling the router to handle requests to “/locations” with the locationsRoute function.

5. We are creating a catch-all route in the Gorilla router to handle all requests in the router that are to a URL other than “/locations”. The route string we are using is “/{url:.*}”, which demonstrates how routes in Gorilla, much like routes in Express, are able to have variables in the path that can be matched with regular expressions. “/{url:.*}” means “match any path that is a / followed by anything that matches the regular expression .* (which means 0 or more characters besides newline)”.

So localhost:1123 matches that because the path given would be “/”, which is / followed by 0 characters. localhost:1123/some-other-path would match because the path “/some-other-path” would be / followed by several characters. But localhost:1123/locations would just be matched to the “/locations” route, not the catch-all route.


Now to add the router in, go to server.go and after db = db add the line:

router := initRouter()


Then replace

http.HandleFunc("/", func(w http.ResponseWriter, r *http.Request){ 
    fmt.Fprintf(w, "Hello world!")
})
                                                                                
with the line:

http.Handle("/", router)


Between http.Handle("/", router) and addStaticRoutes(), our routing logic can now be summed up as:

If a request is to /images/, /partials/, /scripts/, or /styles/, serve the requested file statically from public. If the request is to anything else (remember in Go's standard http package / is the catch-all route), have our Gorilla router handle the request.”

Now run go install and slothful-soda and if you request localhost:1123 you should get:


And if you request localhost:1123/locations you should get:


And now our routing logic is:


Getting our data

Now let's make it so the /locations route fetches our locations data. For the locationsRoute function, we are going to need the DbMap that we generated in initDB to access the database, so to do that, we are going to pass the DbMap into initRouter.

Then, we will pass the DbMap into a function that creates a locationsRoute function that will use the DbMap.

So here is what the code will look like in router.go:
package main

import (
    "encoding/json"                                                    //1
    "fmt"
    "log"
    "net/http"

    "github.com/coopernurse/gorp"                                      //2
    "github.com/gorilla/mux"
)

func indexRoute(w http.ResponseWriter, r *http.Request){
    fmt.Fprintf(w, "<div><img src=\"images/sloth.jpg\" width=\"300px\" height=\"400px\"/>Hello world (now routed with Gorilla)!</div>")
}

func makeLocationsRoute(dbMap *gorp.DbMap) func(http.ResponseWriter, *http.Request){
    return func(w http.ResponseWriter, r *http.Request) {              //3
        var locations []Location
        var locationsJSON []byte

        _, err := dbMap.Select(&locations, "SELECT * FROM locations")  //4

        if err != nil {
            log.Fatal(err)
        }

        locationsJSON, err = json.Marshal(locations)                   //5

        if err != nil {
            log.Fatal(err)
        }

        fmt.Fprintf(w, "%s", locationsJSON)                            //6
    }
}

func initRouter(dbMap *gorp.DbMap) *mux.Router{
    locationsRoute := makeLocationsRoute(dbMap)

    r := mux.NewRouter()
    r.HandleFunc("/locations", locationsRoute)                         //7
    r.HandleFunc("/{url:.*}", indexRoute)

    return r
}
                                                                                
Here's what's going on:

1. For displaying the data we are getting from our database, we will be using Go's standard encoding/json package.

2. Since we need to use the DbMap, we are importing GORP in router.go.

3. makeLocationsRoute takes in a DbMap and puts that makes a handler function using that DbMap. This handler function will fetch our locations from the database and then output the locations as JSON.

4. We use DbMap.Select to run the query “SELECT * FROM locations” to get all of our locations. These locations are converted to Location structs.

5. json.Marshal converts our Location slice to a JSON encoding of the data.

6. Finally the handler function outputs the JSON encoding of the data.

7. We have our Gorilla router handle requests to “/locations” with the handler function generated in makeLocationsRoute.


After putting that code into router.go, in server.go, get rid of the line db = db and replace

router := initRouter()

with

router := initRouter(db)


Run go install and slothful-soda and then go to localhost:1123/locations and you should get:

  
Here is what the routing looks like for getting the locations:


Serving our main page

Now the only change left is to replace the placeholder HTML we serve in the Gorilla router's catch-all route with the HTML for our Angular.js app. We will actually make the Angular.js app in Part 2 of this tutorial, so for now all we need is a placeholder HTML file that will be served by the catch-all route's handler.

In the slothful-soda directory, make a directory called views and in it add an index.html file with this HTML:
<!DOCTYPE html>
<html> 
  <head>
    <title>Slothful Soda coming soon!</title> 
  </head>
  <body> 
    <div>
      <img src="/images/hibiscus.png" /><h1>Slothful Soda Coming Soon!</h1> 
    </div>
  </body>
</html>
                                                                                
And in router.go, replace the indexRoute function's code with:
func indexRoute(w http.ResponseWriter, r *http.Request){
    http.ServeFile(w, r, "views/index.html")
}
                                                                                
http.ServeFile(w, r, "views/index.html") has the file passed into the function be served as the HTTP response, so that function will serve views/index.html as the response for requests to our catch-all route.


Now if we run go install and slothful-soda and go to localhost:1123, we should get:


Now we have written every part of the web app that uses Go, so I will be stopping Part 1 of the tutorial here. In Part 2, we will be writing the Angular.js front end, which will communicate with the Go back end we wrote in this tutorial.

*The mascot at the top of the page is the Go Gopher, which was drawn by Renee French.